Monthly Archives: May 2013

Ray Updates: Add Invoice details in printouts & 6 more features

Here’s the list of new features added to Ray v6 this week –

1. Add invoice details to printouts

You now have the option to add invoice details in your receipt printouts. Instead of having two documents, this one printout with contain both invoice and payment details.

invoice+receipt

2. Age specifications in days and months for children

You can now view age details of infants below 1 year in months, and for children below 12 years age will be displayed in years and months

Age specifications for infants and children

3. Printout option for Reports

You can now print your reports

reports printout option

4. Print Patient Ledger

You can now even take a printout of a patient’s ledger statement

print ledger

5. Product News

We have an improved product news section. On the menu bar you will now be able to see a numbered bubble that contains all the latest product updates at Practo.

Screen Shot 2013-05-30 at 6.14.22 PM

6. Dot Matrix and Thermal paper printouts

You now have the option to take dot matrix and thermal paper printouts for all sections

dot matrix printouts

7. Dates of Procedures and Doctor names can be printed on Invoices

You now can add details of the date when a procedure was done and also the doctor name in an invoice printout.

date and doctor name on invoice printout

Watch this space for more exciting updates next week.

Ray v6 – 35 New Features


  1. Appointment to Payment in seconds

From scheduling an appointment on your calendar to initiating a payment for the completed procedure just takes a few seconds

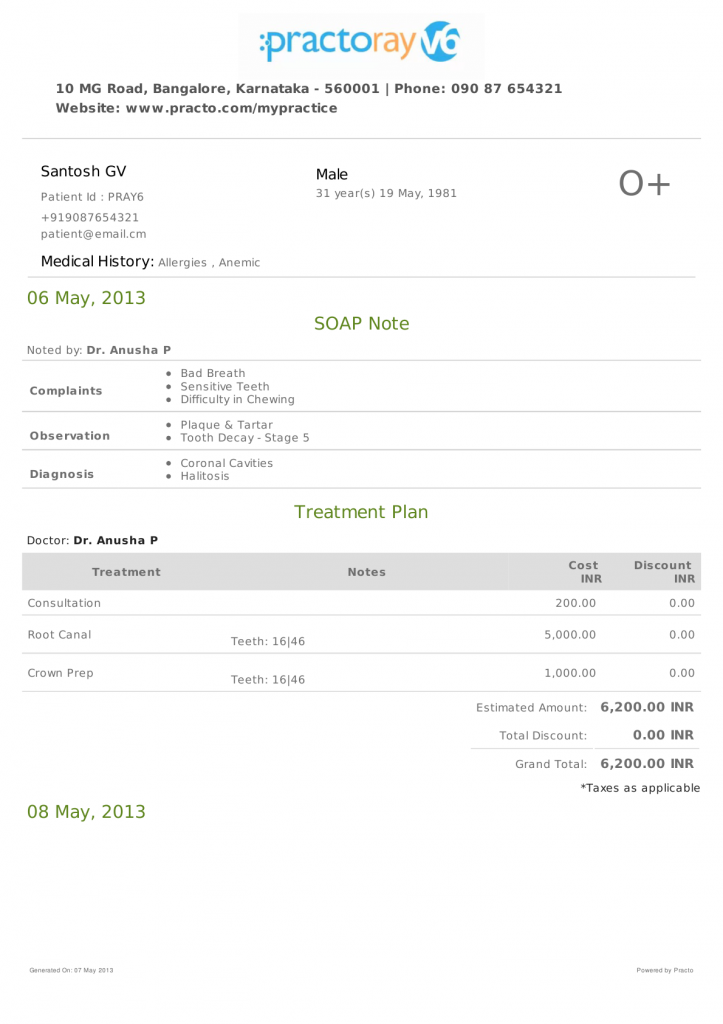
2.  Comprehensive Case sheets

Get detailed information on your patient’s medical  history with case sheets. Save on time and effort during future references
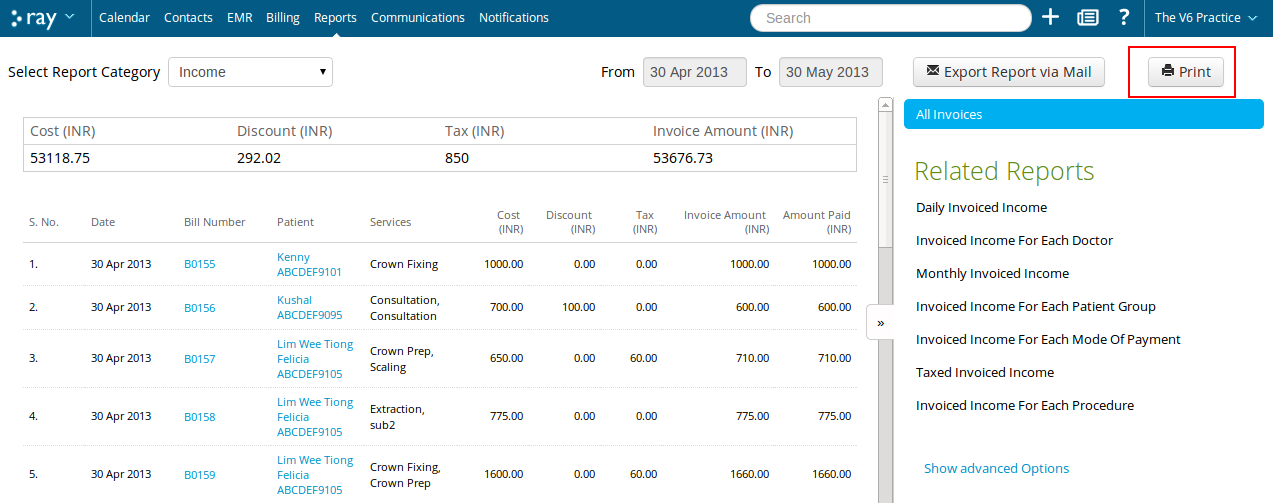
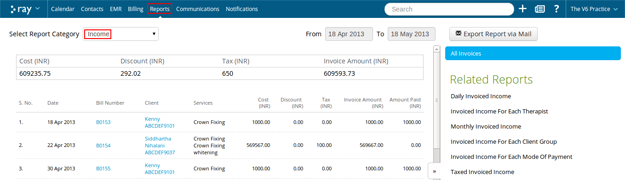
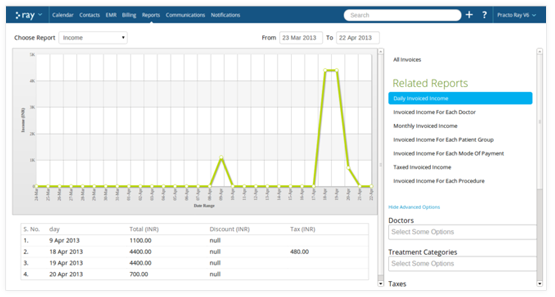
 case sheet


  1. Accurate Reports

50+ smart reports to help you completely analyze every aspect of your practice

 accurate reports


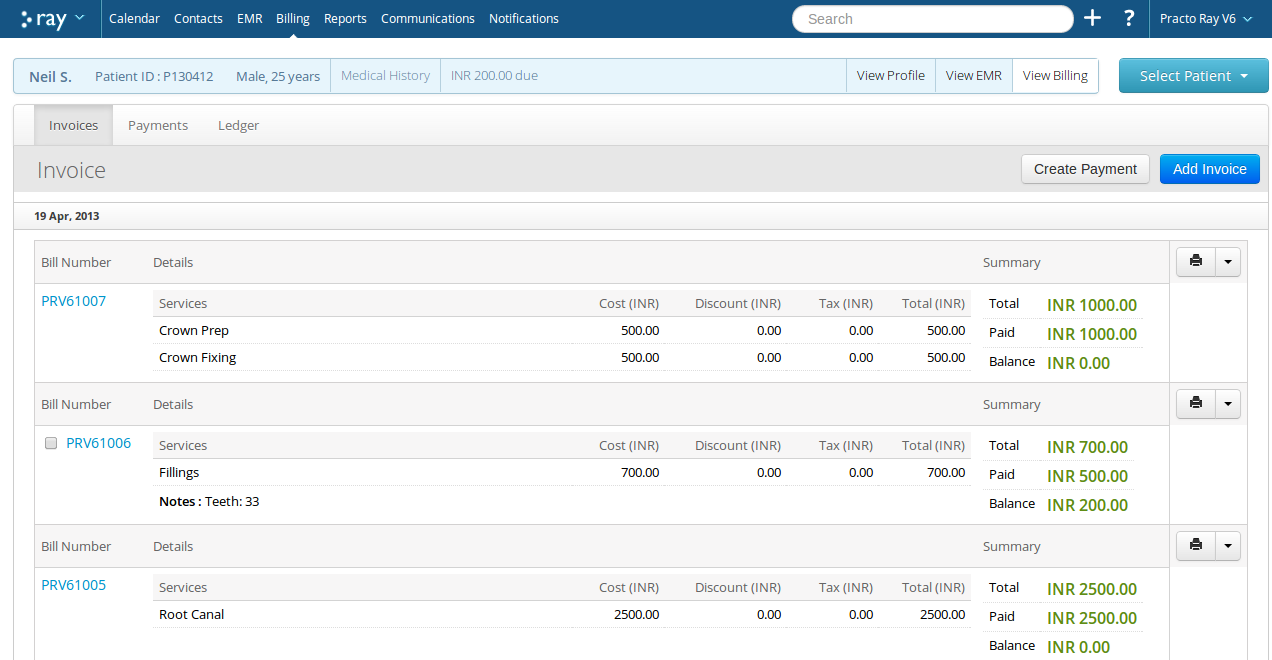
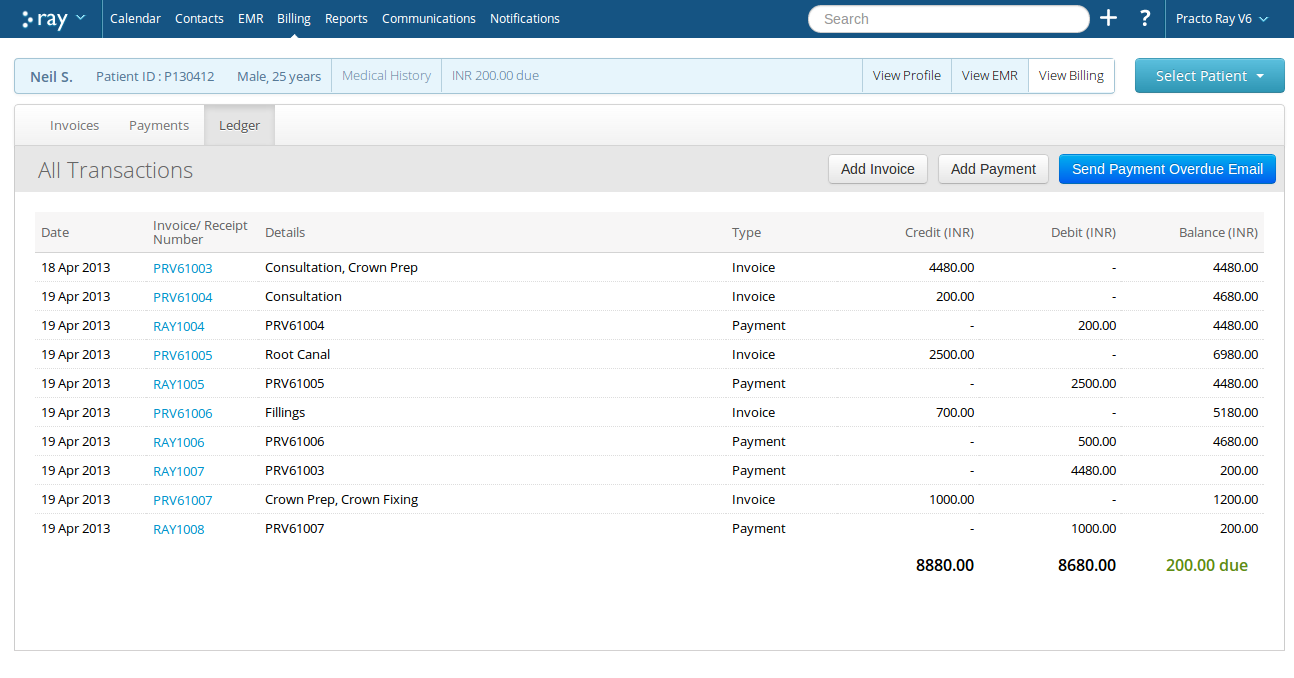
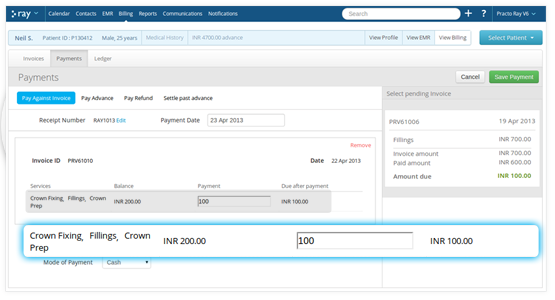
  1. Robust Billing system

A whole new billing system with clear distinction between invoices and payments

 billing


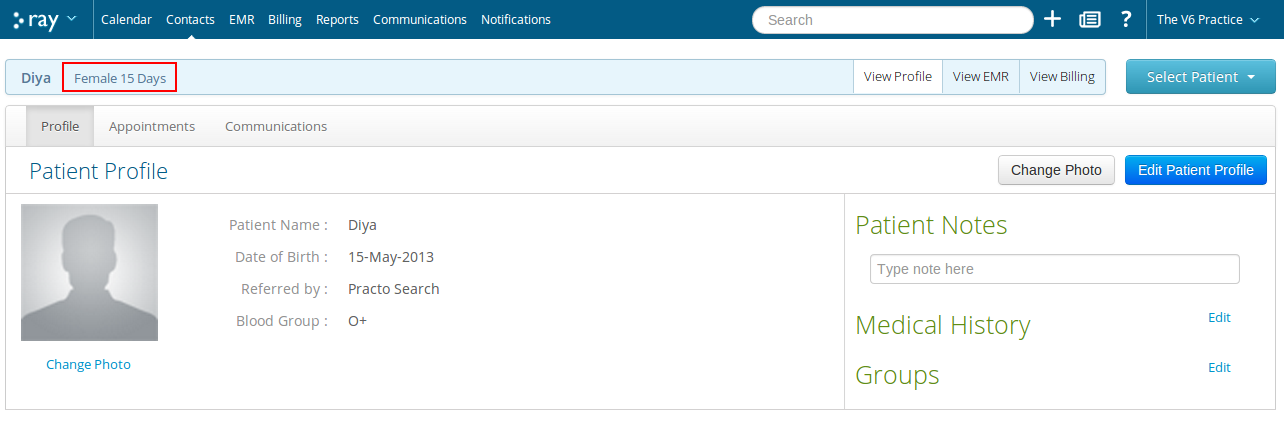
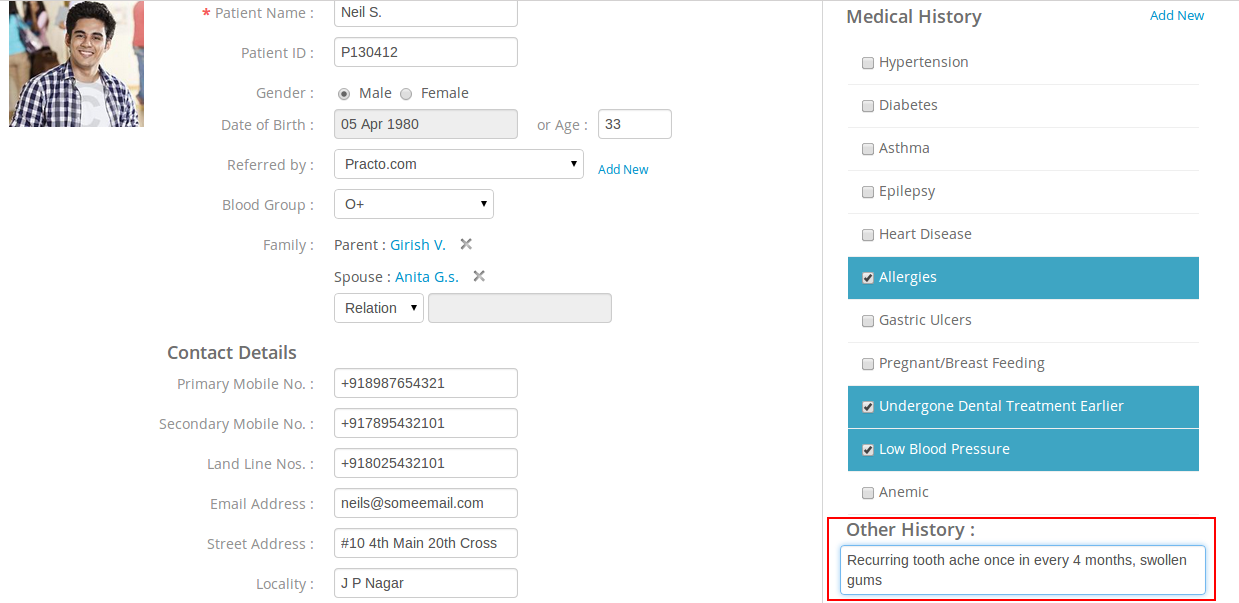
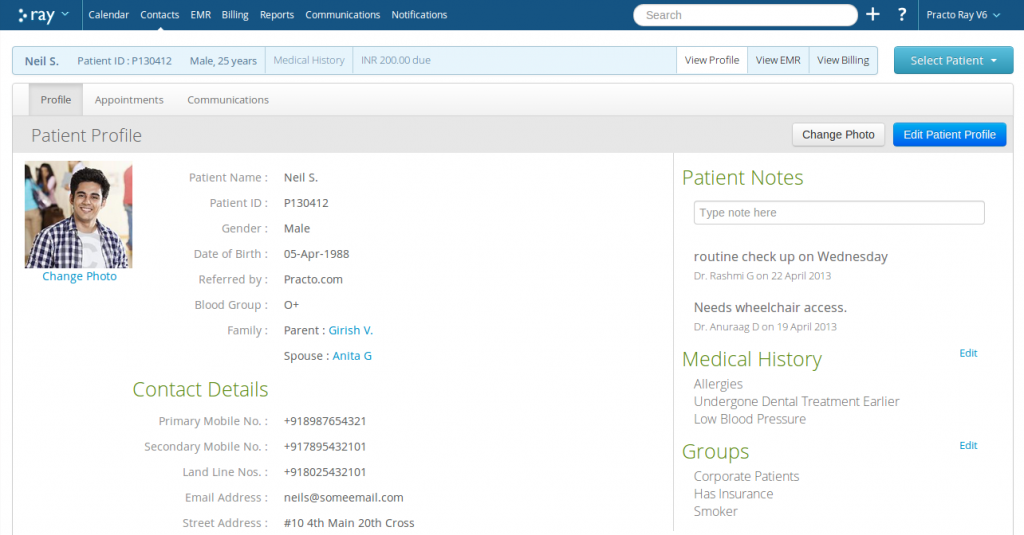
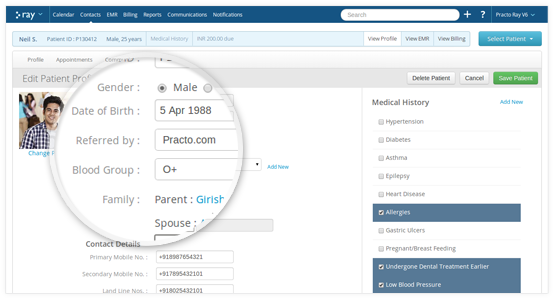
  1. Improved Patient Profile Management

Manage your patients better by adding more details to every profile
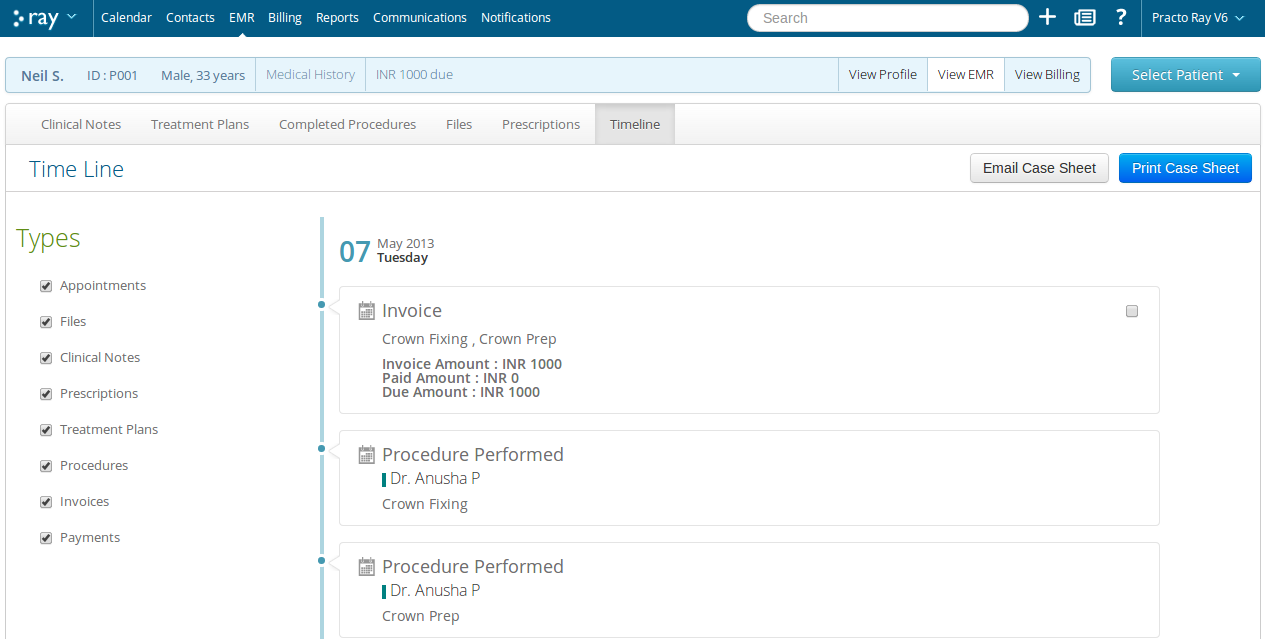
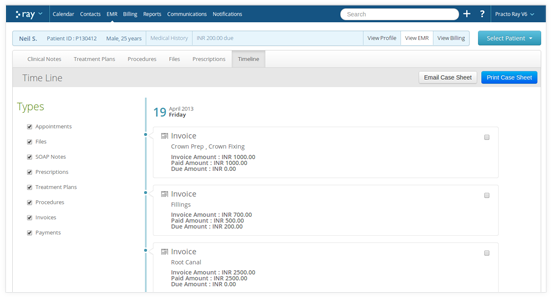
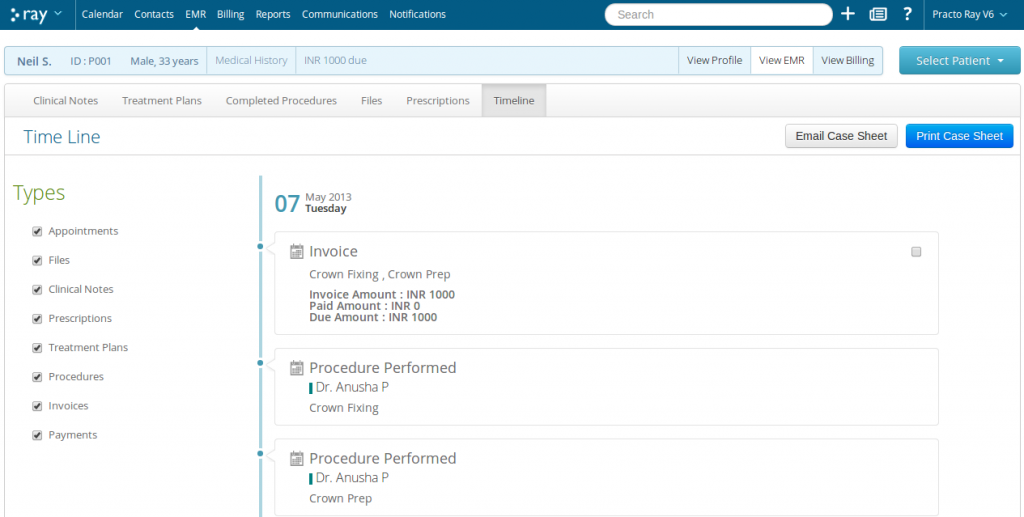
 patient profile


  1. Intuitive Timeline

Get an overview of every clinic-patient interaction and medical history with the timeline. You can selectively choose a patient’s prescription, invoice and payment to print a case sheet
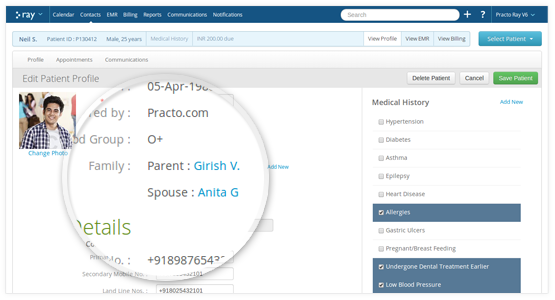
 timeline


  1. Referral sources

Now you can get to know which sources are you being referred by, helping you analyze which sources are working for you the most

 referral sources


  1. Family relation details

You now have the option to add family relation details that will help you analyze a patient’s medical history. You can also wish them on special occasions
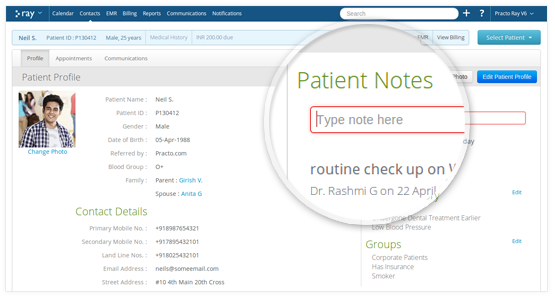
 family relation


  1. Patient Notes

Add multiple notes for each patient. These notes can be seen by all members of your staff.

 patient notes


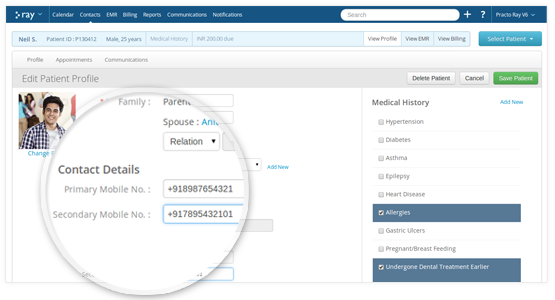
  1. Secondary Mobile number

Add your patient’s secondary mobile number to reach out to them always. SMS will be automatically sent to this number if the primary number is not reachable.
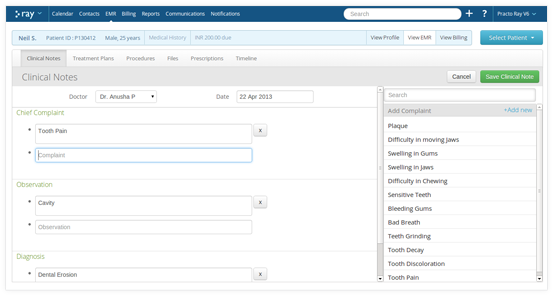
secondary mobile number


  1. Clinical Notes

Now capture the chief complaints, observations and chart a diagnosis for your patients in seconds

 clinical notes


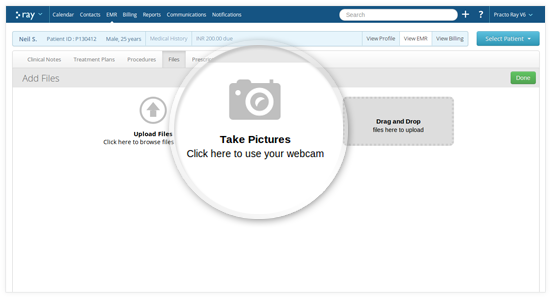
  1. Take Patient Photos with Webcam

Your files can now be integrated with webcam, allowing you to click a patient’s picture and upload it to their profile then and there

 webcam


  1. Mark observations on radiology images

You can add annotations and tags to files for easier management
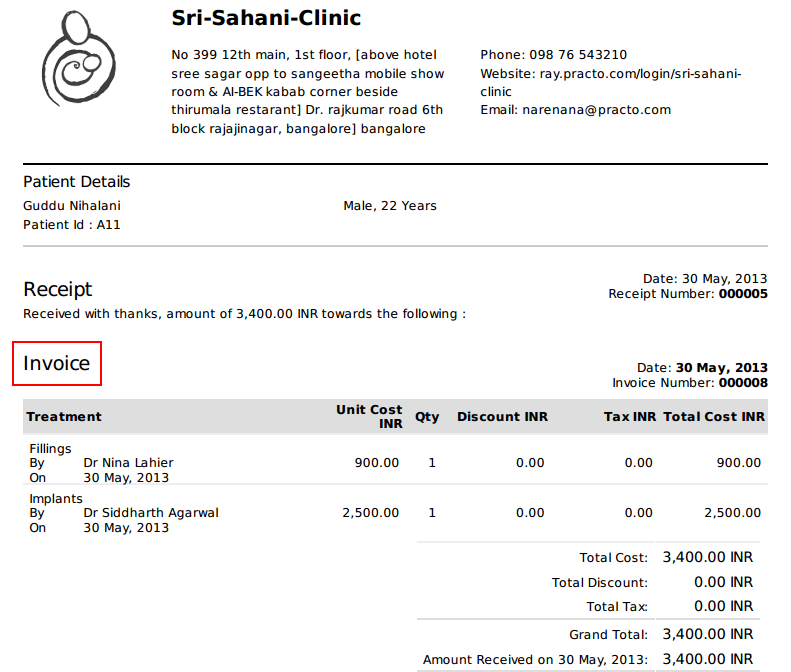
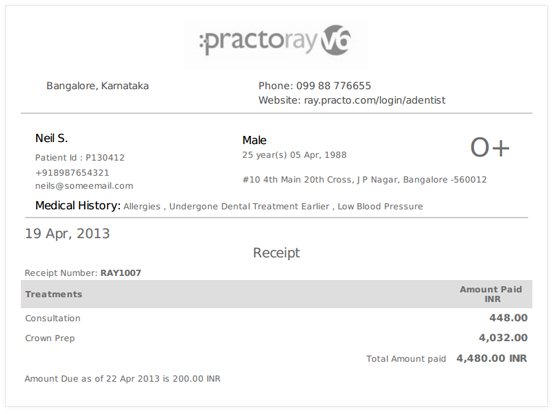
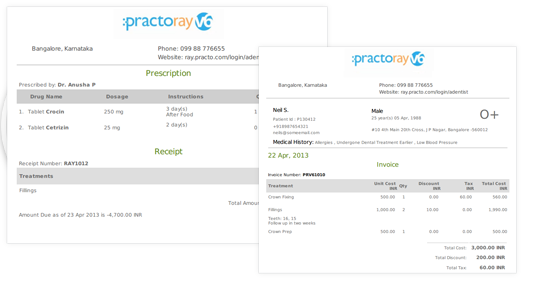
 annotation


  1. Print Receipts

You can print receipts for every financial transaction

 print receipt


  1. Complete Ledger record

Get a detailed list of all amount paid, amount due from each patient

ledger


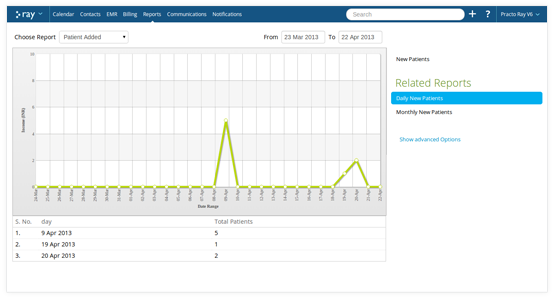
  1. Track Patient Analytics

You can now get daily and monthly reports on every new patient that visits you
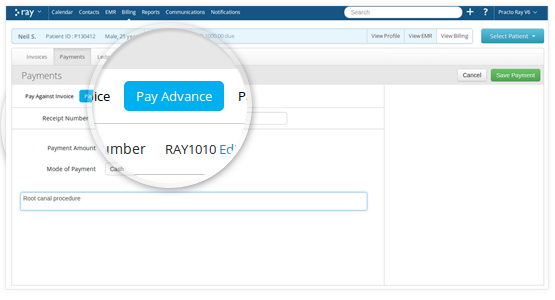
track patient analytics


  1. Advance Payments

You can now accept advance payments for a planned treatment

 advance payments


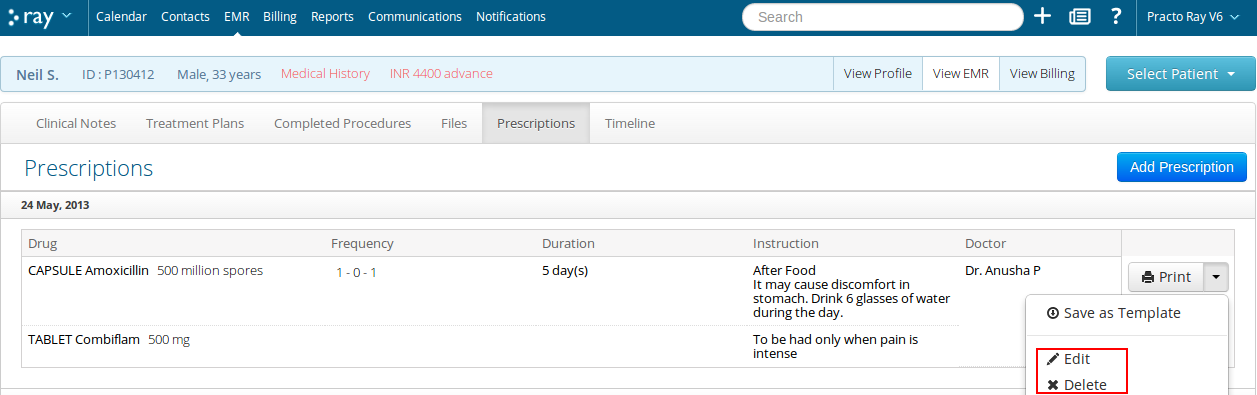
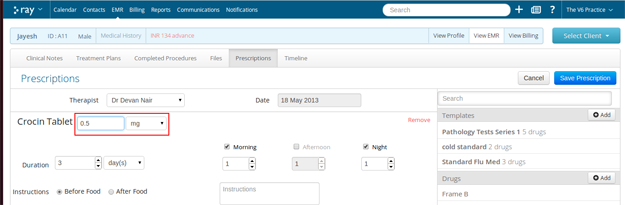
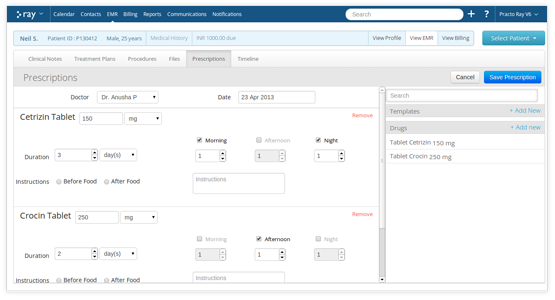
  1. Better Prescriptions

Add precise information on drug dosage and the frequency at which it needs to be taken

 better prescriptions


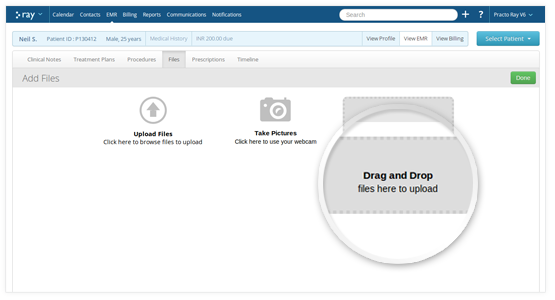
  1. Drag and drop to upload files

Drag files from folders on your computer and add to your Ray browser

 drag and drop files


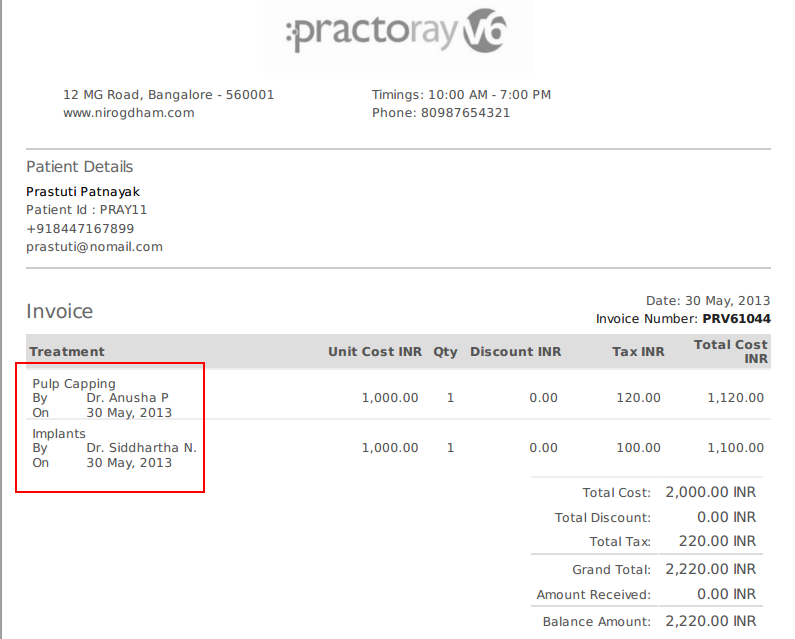
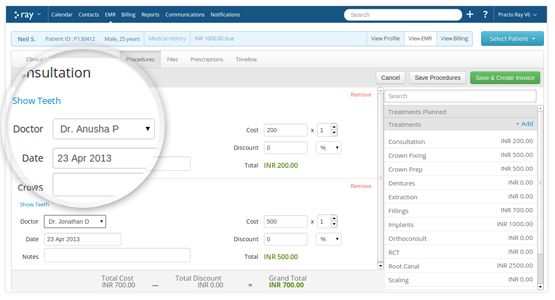
  1. Assign procedures done to multiple doctors

Multiple procedures that are done on the same day can now be assigned to individual doctors who performed it. Add discounts also for each procedure

 assign procedures to doctors


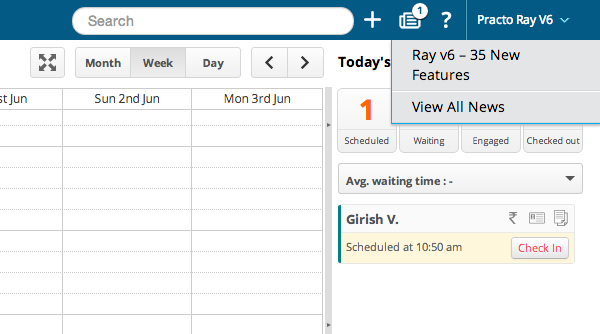
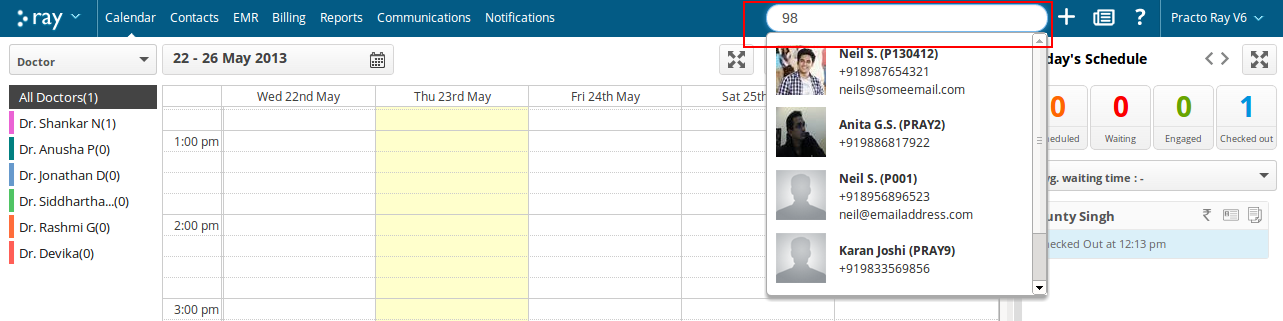
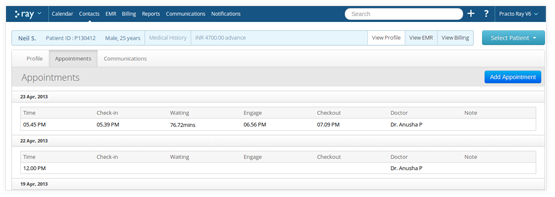
  1. Track your appointment details

Get detailed information on each patient’s check in time, waiting duration, engagement time and check out time.

 track appointment details


  1. Partial Payments

You have the option to accept partial payments
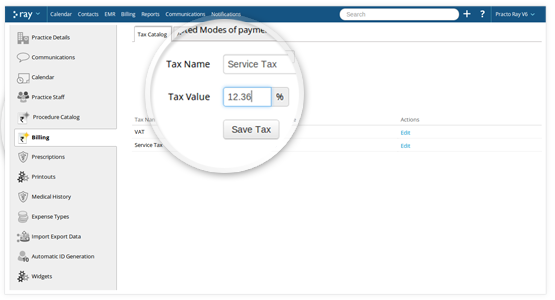
 partial payments


  1. Tax Categories

You can now collect and keep track of taxes that are applicable
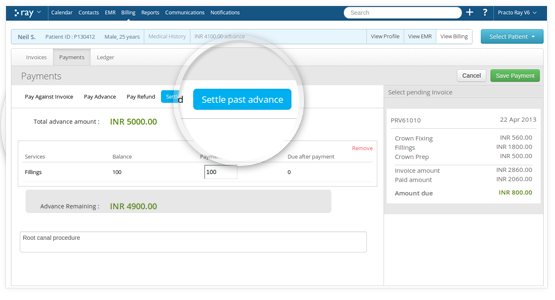
 tax categories


  1. Settlements

You can provide refunds or settle past payments

settle advance


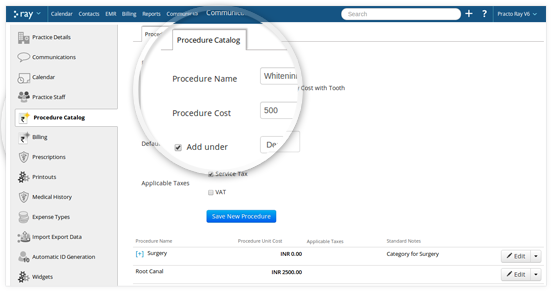
  1. Enhanced Procedure Catalogues

Get a complete list of prices for each procedure. You can even get information on treatments that are taxable

 enhanced procedure catalogues


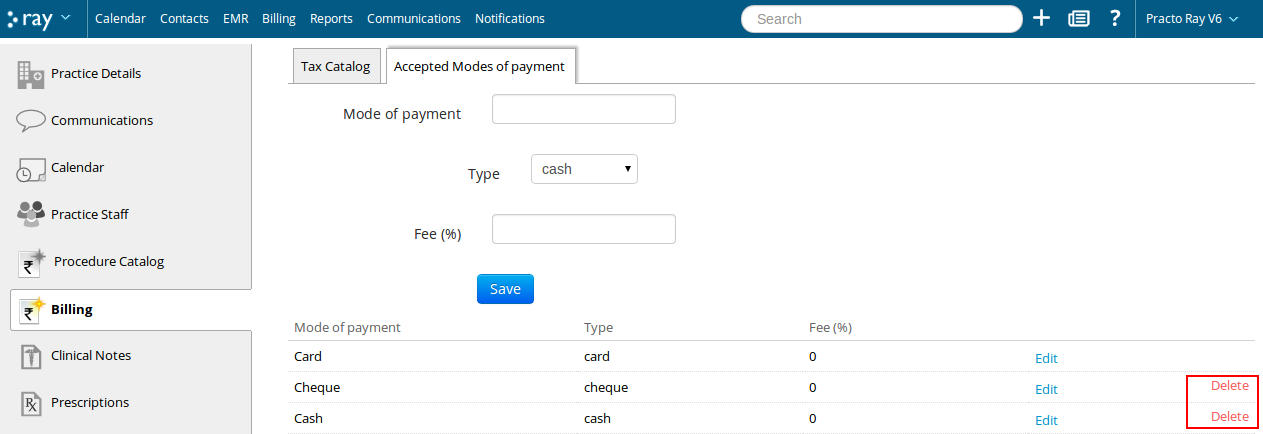
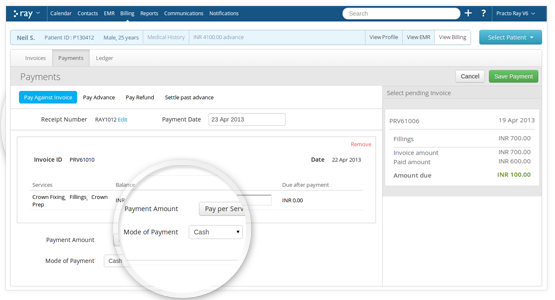
  1. Define your Mode of Payment

You now have the option to accept payment by multiple modes – cash, cheque, online

 define mode of payment


  1. Track transaction fee for card payments

You can now track payment transaction fee for each card payment made

track transaction fee


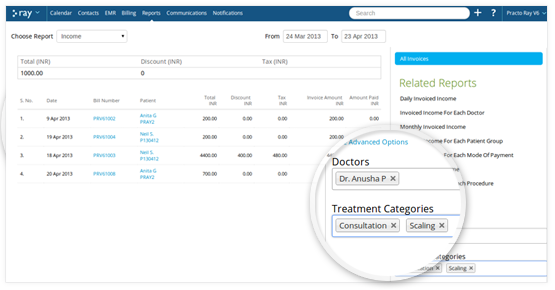
  1. Advanced filters for reports

Every report now has advanced filters helping you get accurate data

 advanced filters for reports


  1. Track amount dues

You can now track amount due not only from each procedure but each doctor as well

track amount dues


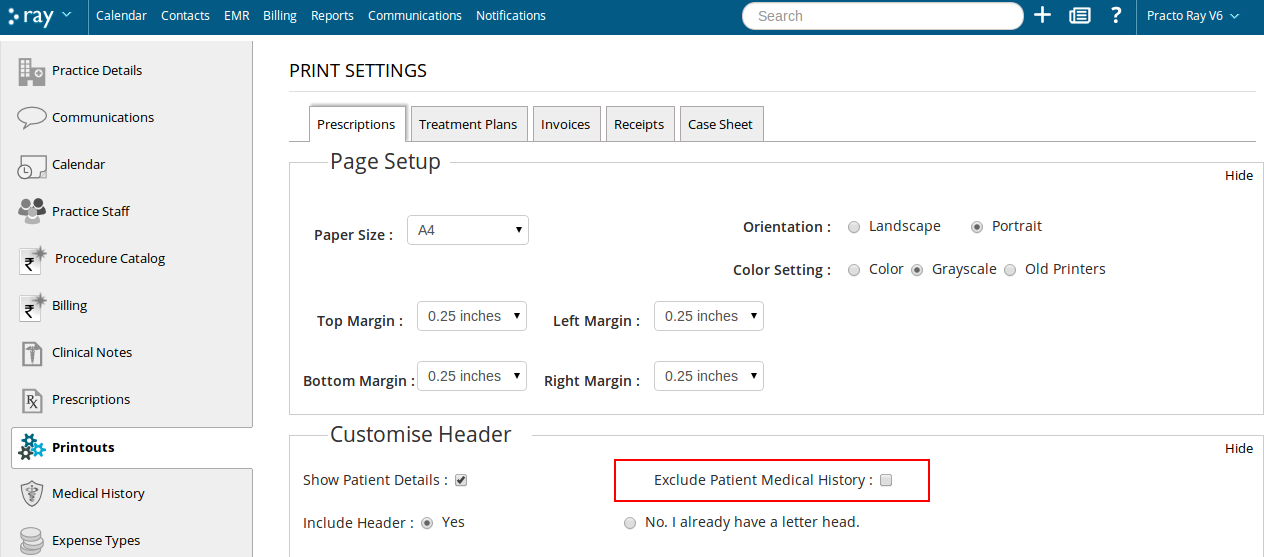
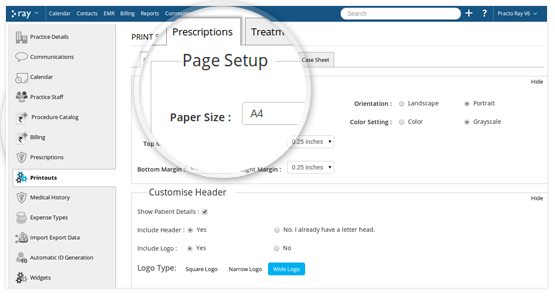
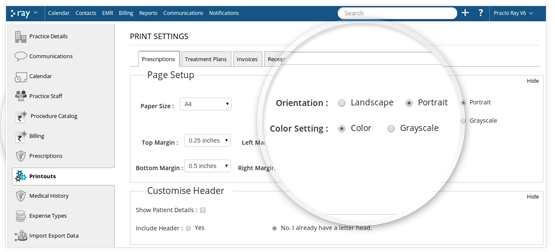
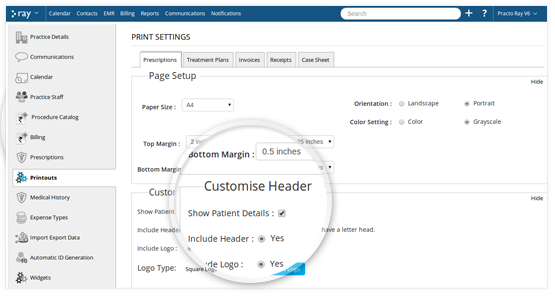
  1. Customize your Printouts

Your printouts can now be customized as per your requirements

customize printouts


  1. Choose from Colour or greyscale printouts

You can now provide colour and greyscale options for printouts

colour and greyscale option


  1. Share Case Sheets with Patients

You can print detailed patient profiles that will include his address, blood group and other details, helping your patients in insurance claims

share casesheet with patients


  1. Header for every page

Every page will now have a header

header for every page


  1. Customized headers

You can customize your header text as per your needs

customized headers


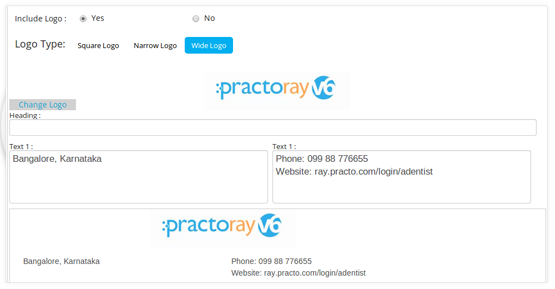
  1. Logo sizes as per your needs

We now have three different types of logo sizes for better customization

logo sizes


Ray Updates: Option to cancel expenses, print ledger, and 7 more features

We promised you in the last news update that we will be adding new features to Ray v6 in the coming weeks. So they are, with the help of all the feedback that you have been providing us.

So here’s the list of enhancements added to Ray v6 this week-

1. Option to cancel expenses

You now have the option to cancel expenses under accounting.
Delete option for expenses


2. Print patient ledger statement

You could earlier only email the ledger to your patients, but now you can print them as well.
print ledger


3. Add age details to patient profile

You can add age details to your patient profiles, without having to enter their birth date.
add age


4. Add medical history notes

You have the option to view your patient’s medical history notes as you did in the previous version, and even add these additional notes to their medical history.
medical notes


5. Better designed medical history tab

Under EMR, we have redesigned the medical history tab. It now opens up as a horizontal bar with your patient’s medical history details listed one after the other, without hindering the view of other tabs.
medical history


6. Edit and delete options for prescription templates

Your prescription template now has both edit and delete options.
prescription edit-del


7. Delete option for accepted modes of payment

In the Billing tab under Settings, the “Accepted Modes of Payment” section, now has a delete option.
modeofpaymentdel


8. Medical history exclusion option in printouts

Under printout settings, you can opt to exclude your patient’s medical history from printouts.
exclude medical history


9. View more options in global search

The ‘Global Search’ bar will now show you more options so that you can get the exact patient details you are looking for.
global

Stay tuned for more updates next week!

Make your practice rank high on Google

While your website counts as the hub of all your online activities, an official website or a mere listing on a online health portal aren’t the only steps involved in making things happen.

When patients turn to cyberspace for healthcare decisions, they are actually googling for information that reassures them about the choice they have made. That’s where a detailed Practo profile page comes into play.

It helps patients read up on the doctor’s credentials, the research papers published, the services provided, the university he went to, the healthcare groups he participates in etc. These little insights into the career and life of that stranger helps patients zero-down on a good doctor whom they can trust their lives with.

We agree that getting on the first page of Google search results can be tricky. But there’s one simple thing that can shoot up your chances to a great extent – a detailed doctor profile page. And it hardly takes 10 minutes!

So here’s how you do it.

Step 1. Login to your Practo.com account.

Step 2. On the menu bar, at the top left corner click on the drop down arrow. From the dropdown listing that appears switch to ‘Practo.com’.

Step 3. On the menu bar, right below the name of your practice click on the ‘Listings’ tab.

Step 4. Under Doctors Profiles, against your name, on the right side of the page you will find a ‘Update Profile’ button. Click on it.

Step 5. At the top you will find a message that says ‘ To update your doctor profile click here’. Click on it.

Step 6. A picture does speak a thousand words, especially when it comes to your profile picture on Practo Search. You can even add in a quick,short summary that best describes you.


Step 7. You can also mention other details such as the various hospitals you have been associated with, the different organizations you are a part of, the awards recieved and so on.


There, you now have a doctor profile page that helps your patients make the right health care decisions and book appointments with you online.


Ray Updates: Ability to further customize printouts, delete patient profiles and more

The past few weeks have been a rollercoaster ride at Practo. The team has been working days and nights together on providing enhancements and improving the features in Ray v6, based on your valuable feedback. So here’s a list of the new features in Ray v6, providing you with a better experience.

Option to delete Patient Profiles

Option to delete patients

Option to delete Clinical notes

Option to delete clinical notes

Option to delete Procedures

Option to delete procedures

It is now possible to delete patient profiles, clinical notes and even procedures in Ray v6

Summary report for income

income report

You can now view the extensive summary of your income earned in our reports section

Add specifications to prescriptions

prescription dosage

We know how important specifications are during drug prescription, therefore you can now add fractional values such as 0.5 mg while prescribing the dosage of drugs for your patients

Customized printouts for invoices

Customized printouts for invoice

We have also enhanced printouts. You can now even get customized printouts for the invoice raised.

It’s your feedback that keeps us going and helps us serve you better. So keep sending us your feedback, and watch out for this space every week for new features that we will add to Ray v6.

Watch Ray V6 Video Tutorials

To help you get started with Practo Ray V6 we have put together these video tutorials. Please let us know if these are helpful and what further topics you would like us to cover. We are always available to you at support@practo.com.

  1. How to Manage New Patient Registrations
  2. How to Add a Walk-in Appointment
  3. How to Create Clinical Notes
  4. How to Create a Treatment Plan and Share Estimate with your Patient
  5. How to Send Completed Procedures for Billing
  6. How to Raise an Invoice for a Completed Procedure
  7. How to Accept Payments and Create Receipts
  8. How to Upload Files, Create Annotations and Add Labels
  9. How to Create a Prescription and Share it with your Patients
  10. How to Create a Prescription Template
  11. How to Accept Advance Payments
  12. How to Settle Advance Payments

1. How to Manage New Patient Registrations

2. How to Add a Walk-in Appointment

3. How to Add Clinical Notes

4. How to Create a Treatment Plan and Share Estimate with your Patient

5. How to Send Completed Procedures for Billing

6. How to Raise an Invoice for a Completed Procedure

7. How to Accept Payments and Create Receipts

8. How to Upload Files, Add Annotations and Labels

9. How to Create a Prescription and Share it with your Patients

10. How to Create a Prescription Template

11. How to Accept Advance Payments

12. How to Settle Advance Payments